🐭 A cursor for augmented reality
How to design a high-fidelity cursor for augmented reality.
6 minute read
Jump to heading Introduction
A few years ago I was working on a mobile augmented reality application where users were able to use their phone to place objects within the environment. To help them with this, there was a 3D reticle visible on the screen that reacted to the environment.
There are several key components that needed to be brought together to create a smooth experience. I will go over each of these techniques, and explain what they add to the final effect.
Jump to heading Hit testing
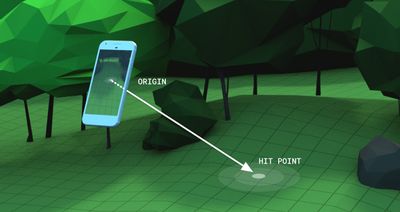
In augmented reality, you can point at your surroundings and the AR system on your phone (ARKit or ARCore depending on your operating system) will figure out the 3D position of the point you are aiming at.
It does this by casting a virtual ray outwards from the screen of the phone, onto the environment. The position where the ray hits the environment, is called the hit point.
In Unity, we can use ARRaycastManager together with ARRaycastHit to retrieve a hit every frame and determine the position of the cursor.
// Determining the target position of the cursor in 3D space.
Pose targetPose = ARHitProvider.hit.pose;
Vector3 targetPosition = targetPose.position;
Jump to heading Cursor movement
While the user moves around, the raycast of the AR system is also updated and so is the hit point (intersection with the environment). The cursor should move corresponding with this hit point.
Jump to heading Movement smoothing
If we would directly set the position of the cursor to the position of the hit point, the movement would appear very jittery. To fix this, we smooth the movement using Vector3.MoveTowards in Unity. The code is as follows:
// Coroutine that moves the cursor.
IEnumerator MoveCursor(Vector3 destination)
{
    // Calculate the distance between the current cursor position and the target position.
    float distance = (destination - cursor.transform.position).magnitude;
    while (distance > 0)
    {
        // Control the movement step (you can control the smoothing here).
        float step = distance * Time.deltaTime / 0.2f;

        // Smoothly move the cursor.
        cursor.transform.position = Vector3.MoveTowards(cursor.transform.position, destination, step);

        // Update the distance.
        distance = (destination - cursor.transform.position).magnitude;
        yield return null;
    }
}
Jump to heading Movement threshold
While operating the phone, the user will often move in a noisy manner. There are always tiny vibrations and movements that we make when moving around. If the cursor would follow this movement 1:1 then the cursor movement would also be noisy and jittery.
To avoid this, we only move the cursor once a certain threshold has been reached. Every frame, we calculate the desired target position of the cursor and compare it with the actual cursor position. If the difference between the current position and the target position is above a certain movement threshold, only then do we move the cursor. The code looks as follows:
targetPose = hitProvider.hit.pose;
float distanceFromTarget = (targetPose.position - currentCursorPosition).magnitude;

if (distanceFromTarget >= movementThreshold) {
    // move the cursor
}
Jump to heading Cursor visibility
In order to not overload the user with information, we only make the cursor visible in contexts where the user should actually be able to place objects. There are 3 checks that we perform to determine whether or not we should show the cursor.
Jump to heading 1. Feature count check
Firstly, we check if the AR system has detected enough feature points in the environment. Since the AR system requires environmental features to detect a surface to be able to accurately place an object, we only want to show the cursor when the environment is being accurately tracked.
We compare the feature count with a threshold and if the feature count is too low, we hide the cursor,
if (PointCloudProvider.FeatureCount < featureThreshold) DisableCursor();
else ShowCursor();
To get the number of feature points, we use Unity's AR Point Cloud Manager.
Jump to heading 2. Point cloud update check
While moving around, the AR system updates the point cloud of features that is generated for the environment. If it has been too long since the last update of this point cloud, it means that the environment is no longer being accurately tracked.
If the last update has been too long ago we hide the cursor.
if (Time.time - pointCloudProvider.LastPointCloudUpdate > timeOutThreshold) DisableCursor();
else ShowCursor();
Just like for the feature count, we use Unity's AR Point Cloud Manager to get the last point cloud update time.
Jump to heading 3. Distance check
Lastly, if the user points far into the distance, they should not be able to place objects since either:
- the distant surface is not accurately tracked
- the placed object would be too small
Because of this, we only display the cursor if phone is pointing to point that is in the near vicinity of the user. We check the distance between the hit point and the position of the camera. If this distance is too great, we do not show the cursor.
float distanceFromCamera = Vector3.Distance(targetPose.position, mainCamera.transform.position);
if (distanceFromCamera > distanceThreshold) DisableCursor();
else ShowCursor();
If we would leave the code like this, we would get very jittery behaviour right near the edge of the distance threshold. The distance check will constantly switch between evaluating to true.false and as a result, the cursor will flicker on and off.
A neat way to combat this, is to make use of a Hysteresis function. In short, this function enables use to have a different threshold, based on the direction (going out of distance to within distance vs going within distance to out of distance). This will completely avoid the flickering effect and give a smooth result.
In code it looks like this:
if (withinDistance == false && distanceFromCamera > (distanceThreshold - distanceHysteresis * 0.5)) DisableCursor();
else if (withinDistance == true && distanceFromCamera > (distanceThreshold + distanceHysteresis * 0.5))
{
    withinDistance = false;
    EnableCursor();
}
else
{
    withinDistance = true;
    EnableCursor();
}
Jump to heading Object placement
When the users clicks the placement button, the cursor plays a short feedback animation. This is a sample scale-in-scale-out during a period of 300 milliseconds.
For this effect, I use the DOTween tweening package for Unity. You could of course use any tweening library. The code looks as follows:
DOTween.Sequence()
    .Append(cursor.transform.DOScale(0.5f, 0.1f))
    .Append(cursor.transform.DOScale(1f, 0.2f));
Jump to heading Conclusion
The final result is a smooth 3D cursor that can be used in AR applications. The movement is smooth and there is no jitter at all. The cursor only appears when needed and provides the user with appropriate feedback.
The code can be found below. I just lifted it from my project and so you will probably not be able to just copy-paste it, but the important ideas are there.